I am addicted to those desk setup videos. Finally, after drooling over an Amazon cart of about 30 items, I pulled the trigger. My final desk setup was more incredible than I could have ever expected.
In this post, I’ll take you through everything in my dream desk setup (which I now have). Without further ado, let’s get right into let’s start with the beast that runs it all, the computer.
As a quick side note, no one is sponsoring this video. Some of the links, however, are affiliate links. Even though it may sound like some of this post is sponsored at times, that’s because I love some of this stuff. These items have made my life healthier and easier.
Computer
The MacBook Pro has changed the game for me. No stuttering with multiple 4k libraries I am working on in Final Cut Pro, thumbnails in Photoshop and Lightroom, and 900 Safari tabs. The computer I was using before this was the m1 mini which was great, but I can’t imagine using anything different now.
- M1 Max with 10-core CPU, 32-core GPU, 16-core Neural Engine
- 64 GB Unified Memory
- 8 TB SSD storage
Now that I use the Studio Display, I stand up the Mac on this laptop stand – OMOTON Double Desktop Stand.
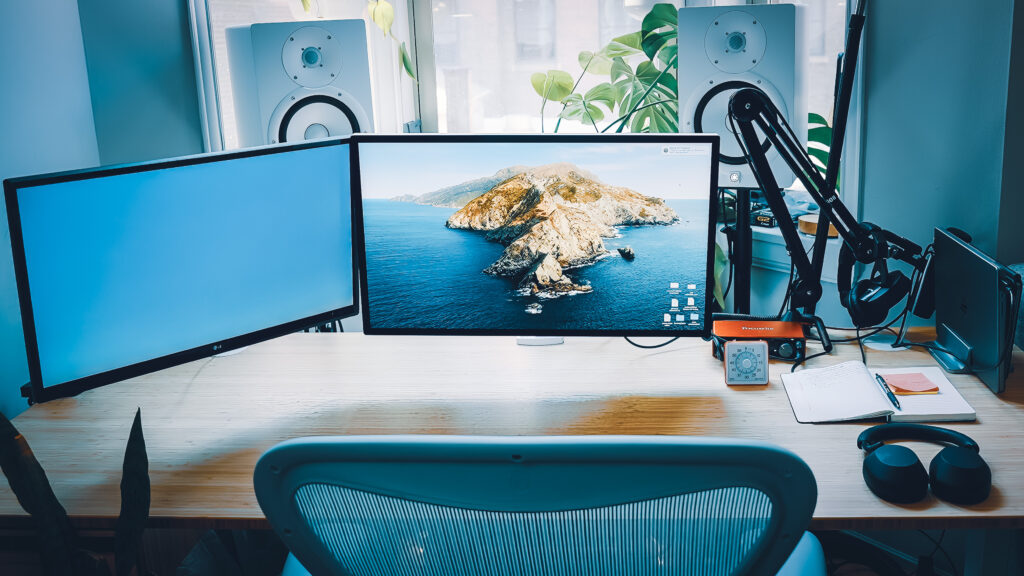
Displays
Main Display: Apple Studio Display with VESA Mount Adapter
Side Display: LG 27GL83A-B 27″ Monitor
I hook up both of these to my desk with Monitor Arms, so I have space under the monitor, and they appear to be floating.
For the studio display: Fully Jarvis Monitor Mounting Arm (it’s worth the extra money, especially for the beefy studio display, plus it looks great in white)
For the LG monitor: HUANUO Single Monitor Mount
Ports and Storage
Docking Station
The coolest thing I have in this section is the CalDigit TS3 Plus Docking Station it has:
- 1 x Gigabit Ethernet
- 2 x Thunderbolt 3
- 1 x Display Port
- 5 x USB 3.1
- 1 x SD Card Reader
- 1 x Digital Optical Out
- 1 x Analog Audio In | 1 x Analog Audio Out
As a side note, make sure that if you use this far away from your computer, you need a thunderbolt 3 or 4 cables to work. I bought a longer one that works when my desk goes from sitting mode to standing mode.
The TS3 is not being made anymore, they released a TS4, but there are some issues with drive dumping, according to some reviews. Please do your research, but I think a docking station is fantastic for your desk setup.
External Drives
I also have a couple of external drives:
- Glyph 16 TB External Drive (Where I store finished entire libraries)
- LaCie d2 Professional 16 TB
- I now use the above before these; I had about 10 of these: WD 5 TB, My Passport for Mac.
Cables
I use many different cables; importantly, you need thunderbolt cables for certain things. Faster and longer is usually always better, so Thunderbolt 4 > Thunderbolt 3 and 10ft > 6ft. Here are my favorite cables:
Desk and Chair
When thinking about what desk and chair to use, I came at it with the same ideology regarding my bed. If I am spending 8 hours + a day in my bed, I am willing to invest a seemingly ridiculous amount of money. The same is true for my desk and chair, mainly because somedays I am sitting at the desk for 12+ hours.
Studies indicate that sitting or standing in one place for a certain amount of time is not great for you. This is why I wanted a desk that goes in-between standing and sitting. At least every two hours, I switch my desk from sitting mode to standing mode. Also, when in character mode, I use a little balance board from Fully to hopefully be more in a “movement mode” instead of a static mode. Furthermore, when I am in standing mode, I do more movements like push-ups or stretching.
However, I find myself sitting for usually greater than 75% of the time I am at the desk. So, I also wanted to invest in the best chair possible. I tried out a couple before I decided on which chair to use.
The Desk
I wanted the widest and flattest desk possible. I also, of course, wanted a desk that could convert to a standing desk. The Fully standing desk has been recommended to me by countless people, and I loved how I could customize additional items on the website.
The desk I decided on was the Jarvis 72″ x 30″ Bamboo Desk with the following customizations:
- White Lifting Columns
- White Programmable Frame
- USBC Power Grommet – White
- Desk Hooks
- Bamboo Desk Drawer
- Clamp Mounted Surge Protector
- Floatdeck
- Single Jarvis Monitor Arm
The Chair
The final decision was on the Herman Miller Aeron. The chair felt the most comfortable sitting in after I tried out a bunch of other chairs, including:
- Herman Miller Cosm
- Herman Miller Embody
- Herman Miller Says
- Steelcase Leap
- HAG Capisco Chair
In the end, I picked the Aeron because the mesh back was airy and comfortable; I liked the range of movement it provided, like rocking back and forth. I liked the extreme customizability, including the height, lumbar support, arm adjustments, and tilting tension.
Also it looks awesome.
Audio Equipment
My audio equipment setup got a serious upgrade here; now, I have a fantastic microphone and speaker system that runs through a USB audio interface.
Audio Interface
Focusrite Scarlett 2i2 Audio Interface
Speakers
The speakers both need to be plugged into the wall, and they each need their cables which will plug into the audio interface. You will need an XLR Male to 1/4″ TRS Male to go from the speaker into an audio interface; I used these.
Headphones
Occasionally there are lots of city noises, or I just want to wear headphones. I used the Bose Noise Reducing headphones for the longest time, but they broke after seven years of use, so I decided to upgrade to something else. So far, these headphones are fabulous.
Microphone
The Mac Studio speakers and microphone aren’t bad at all; however, I use the Shure microphone if I want to make sure I sound and hear as good as possible.
RODE PSA 1 Swivel Mount Microphone Boom Arm
So it goes Shure microphone → XLR cable → Cloudlifter → XLR cable → Focusrite → computer.
Additional items
I tried to keep the surface of my desk as minimal as possible. However, here are a few things that I always keep on my desk.
- Elgato Cam Link 4k – if I ever feel like really leveling up my zoom quality, I’ll use this with my A7 size and Shure microphone
- Basic Lined Notebook – these PAPERAGE ones are nice; this is where I list my weekly or monthly tasks and big plans
- Post-it notes: any will do; this is where I document my daily tasks
- Pilot Precise V5 Pens
- Pomodoro Timer
- Plant – any plant will do; a little bit of bonus green is excellent; just be careful with the watering…
Thanks for reading along! This desk setup is a dream come true.